Database and ODBC
Data Splitter can interact with a user-defined database. It uses ODBC, "Open Database Connectivity", to :
- Allow user access to database table and field names,
- Transmit data to the database,
- Execute generated SQL (Structured Query Language) statements.
The user must :
- Create the database,
- Configure an ODBC "Data Source Name" for the database,
- Connect the Data Splitter solution to the ODBC data source.
ODBC allows software products to interact with a wide variety of Database Management Systems (DBMSs). The DBMS must provide a software component known as an ODBC "driver". Most DBMSs available on Windows platforms provide ODBC drivers.
A simple database can be created in a matter of minutes. Steps 2 and 3 are even simpler, once you know how ...
Creating a database
The user must provide the "target" database. This will typically involve using a DBMS (Database Management System) to create one or more tables.
A table is defined as a group of "columns", or "fields". Each field has attributes :
- name
- type
- length
- ...
Here's how to create a database using Microsoft Access :
- Select the "File/New" menu option and choose the Database icon,
- Choose a name for your new database,
- Select one of the "Create table" options,
- Define your fields (this may require some thought, and revision!),
- Save your new database / table - this creates a new file with the .MDB extension.
A few hints :
- The field type will typically be "text", or "char". Pick "text" if you are uncertain what field type to use. Quantities will always be "numeric", but part "numbers" often contain dashes and letters, in which case they must be defined as "text" fields.
- Ensure that all your fields are wide enough to accommodate the largest possible input. When estimating field length err on the side of making it too large, or make the field a variable-length "memo" field.
- It is strongly recommended that you choose table and field names with no embedded blanks. Embedded blanks seem to cause problems for the MS Access ODBC driver. Avoiding embedded blanks in identifiers is a good general principle to follow as you navigate the computing minefield.
- Configure fields to allow "null" values, or set "required" to "no", or "allow zero length". In some cases the entire record will be rejected if one of the incoming fields is empty and that field doesn't accept null values.
At times Data Splitter will appear to scan the input correctly, but the target database will be empty or missing some expected data. The cause is very often a mismatched data type, or insufficient field width(s). A good general strategy is to "relax" the table initially - create all "memo" fields, or "text(255)", then tighten the table up after it's loading correctly.
Check the program's status box at the bottom after a run - if it says "View log for messages" there's something that needs attention. Check the log (View/Log option). The messages are sometimes cryptic, but helpful more often than not. If you're having trouble you can submit the log (if it's huge just send the top 50 / bottom 50 lines or so).
Contact Data Splitter support for assistance with database issues.
Configuring an ODBC Data Source
The user must configure an ODBC "Data Source Name" (DSN) for the database. This is a simple process of choosing a label and applying it to the database. A Windows program: the ODBC Data Source Administrator, is used for this purpose.
The ODBC Data Source Administrator program can be started in several ways :
- Choosing Data Splitter menu option "Input/Output | ODBC Administrator",
- Clicking on the Windows Control Panel "ODBC" icon,
- Entering "ODBCAD32" and the Windows command prompt,
- Consulting Windows Help and Support: search on "ODBC".
These options are presented because the ODBC Data Source Administrator can be difficult to locate on some systems. The program's file name is ODBCAD32.EXE, and it is often (but not always) in the \WINDOWS\SYSTEM32 directory. Contact Data Splitter support if you have trouble finding it.
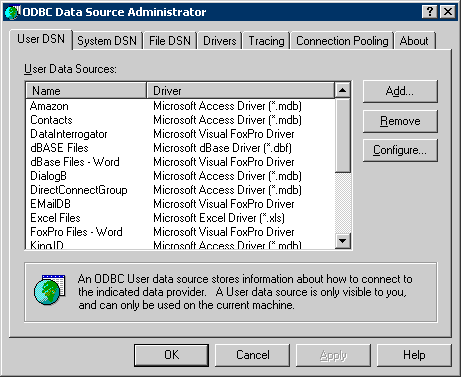
Once you are running the ODBC Data Source Administrator choose the "Add" option in the first dialog to add a new Data Source :

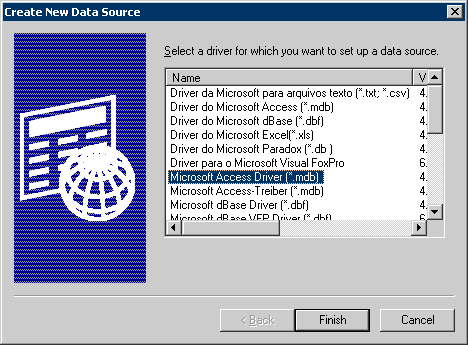
In the next dialog choose the appropriate ODBC driver for your DBMS :

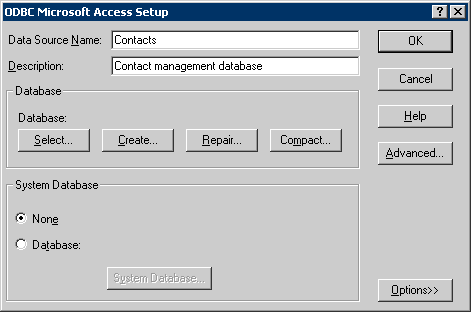
The next dialog, which is DBMS-specific, allows you to specify the Data Source Name and the location of your database :

Once you have specified the Data Source Name, the driver, and the database location you are ready for the next step - connecting Data Splitter to the Data Source you have just configured ...
Connecting Data Splitter to the Data Source
After setting up the database and the ODBC data source, configure the new Data Source Name in Data Splitter :
- Select the Input/Output | Database menu item,
- Press <F1> in the "Database" field to start the "Select Data Source" dialog,
- Select the Data Source Name configured in the ODBC setup (probably under the "Machine Data Source" tab).
This will establish Data Splitter's connection with the database and make the database table and field names visible within the Data Splitter solution as "targets".
SQL statement for creating sample table "message" : SQLMessage.txt.
SQL statement that works with Microsoft Access : SQLMessageA.txt. Memo fields are used rather than char(n) (because MS Access fails to load the record if the character allocation for any field is exceeded).
Data Splitter has been tested with Microsoft Access 2000-2003 and Microsoft Visual FoxPro 6.0, and should work with any DBMS that provides a suitable ODBC driver.